By leveraging this integration, users can streamline their accounting workflows by effortlessly pushing GRNs (invoices) from Supy directly into Xero accounting software. This guide provides step-by-step instructions to set up and configure the integration, empowering users to optimize their accounting processes and enhance productivity.
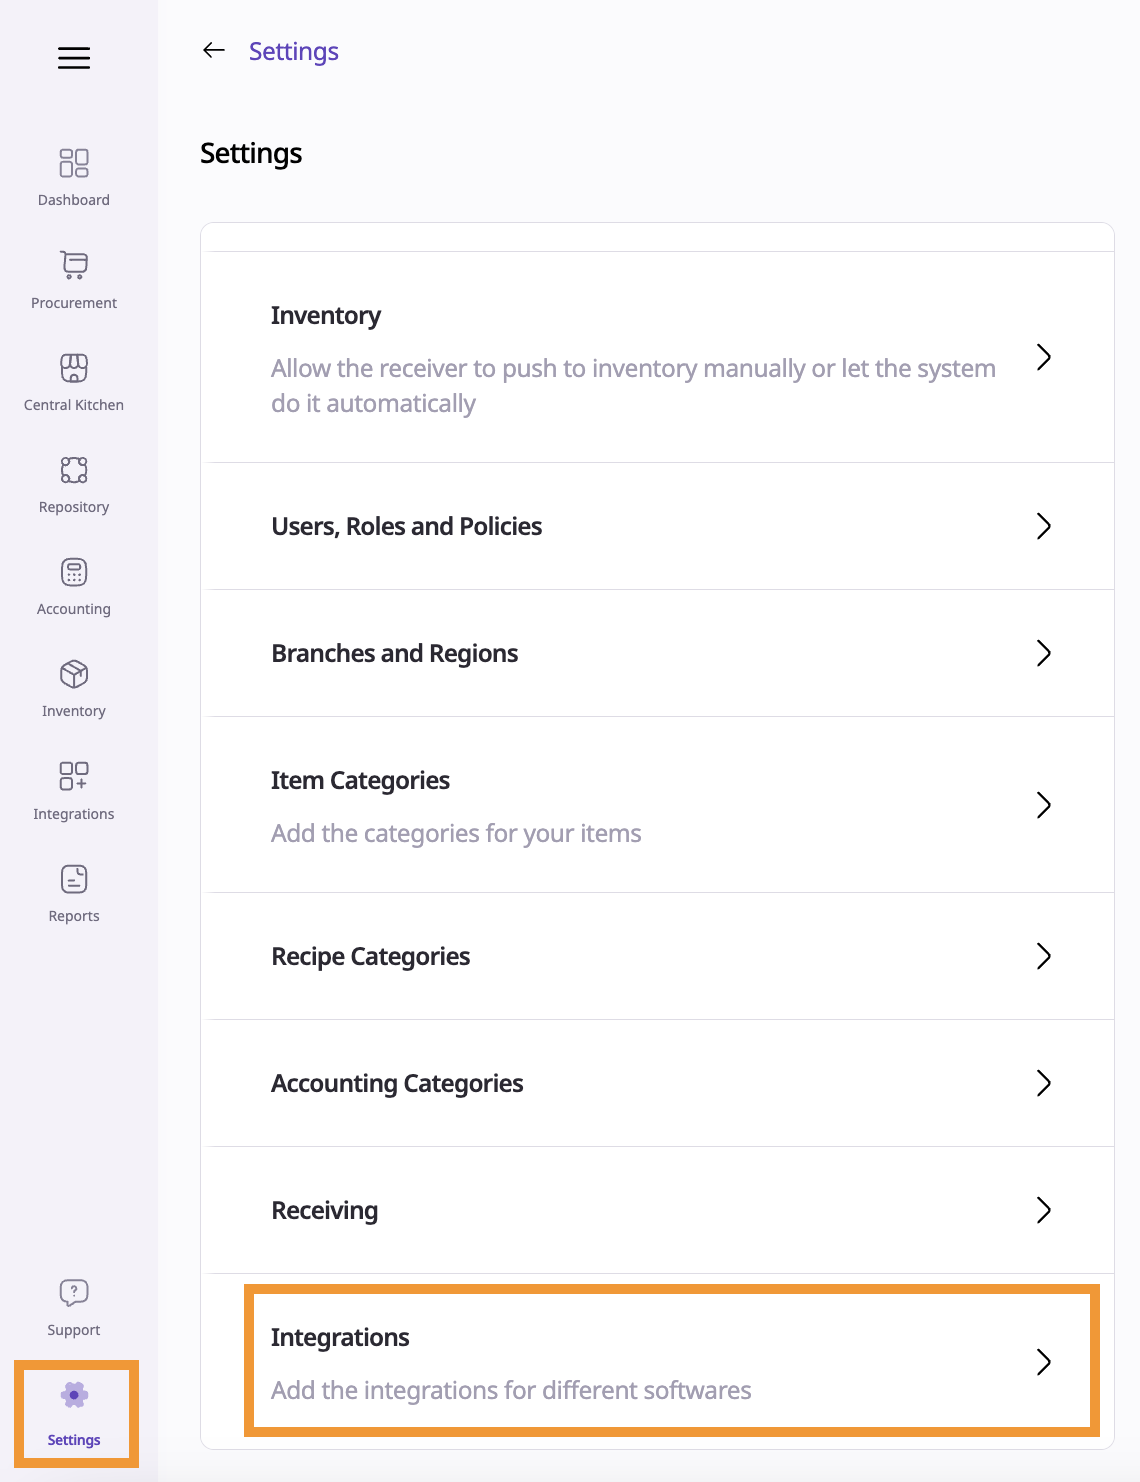
Open your Supy portal and navigate to the ‘Settings’ tab. From here, click ‘Integrations'.
In the top right corner, click on ‘Add New Integration Provider’ button

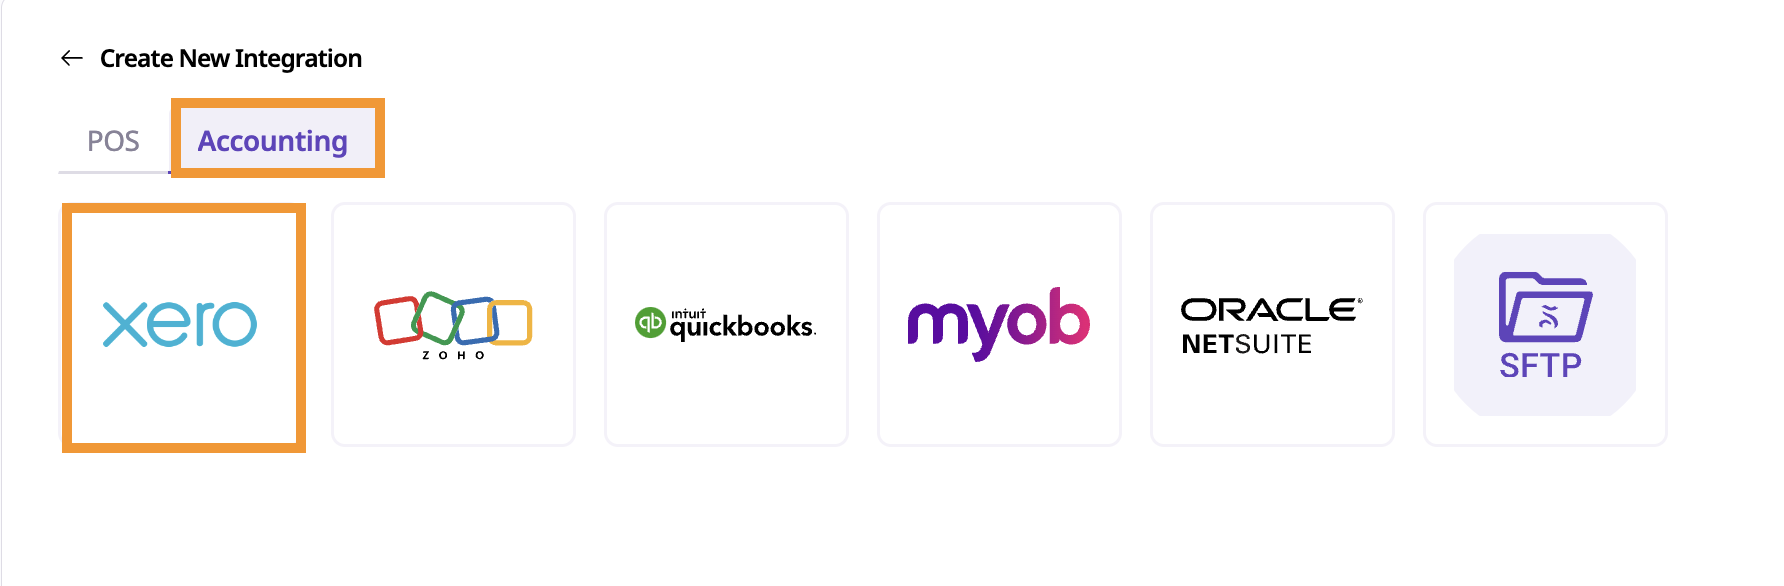
Click on the ‘Accounting’ tab on the Create New Integration UI and then select ‘Xero’ from the available accounting software options.
This will navigate to ‘Xero’ login page
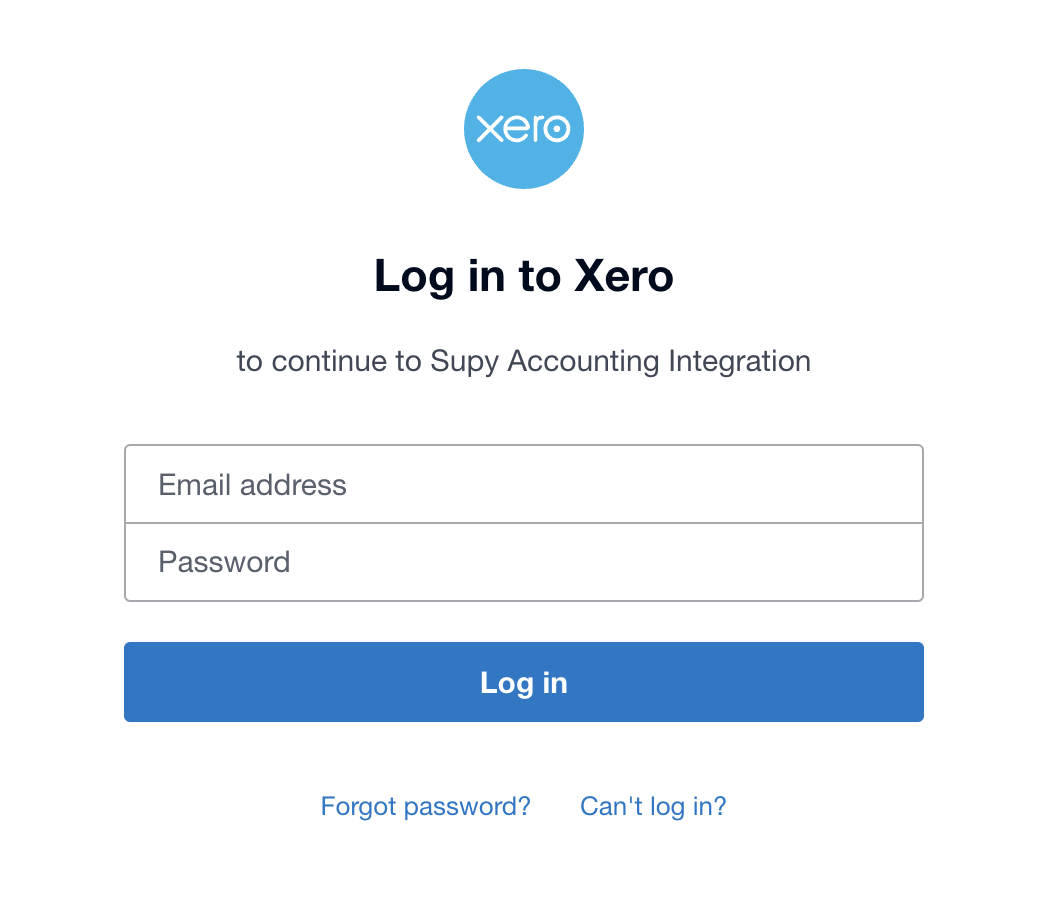
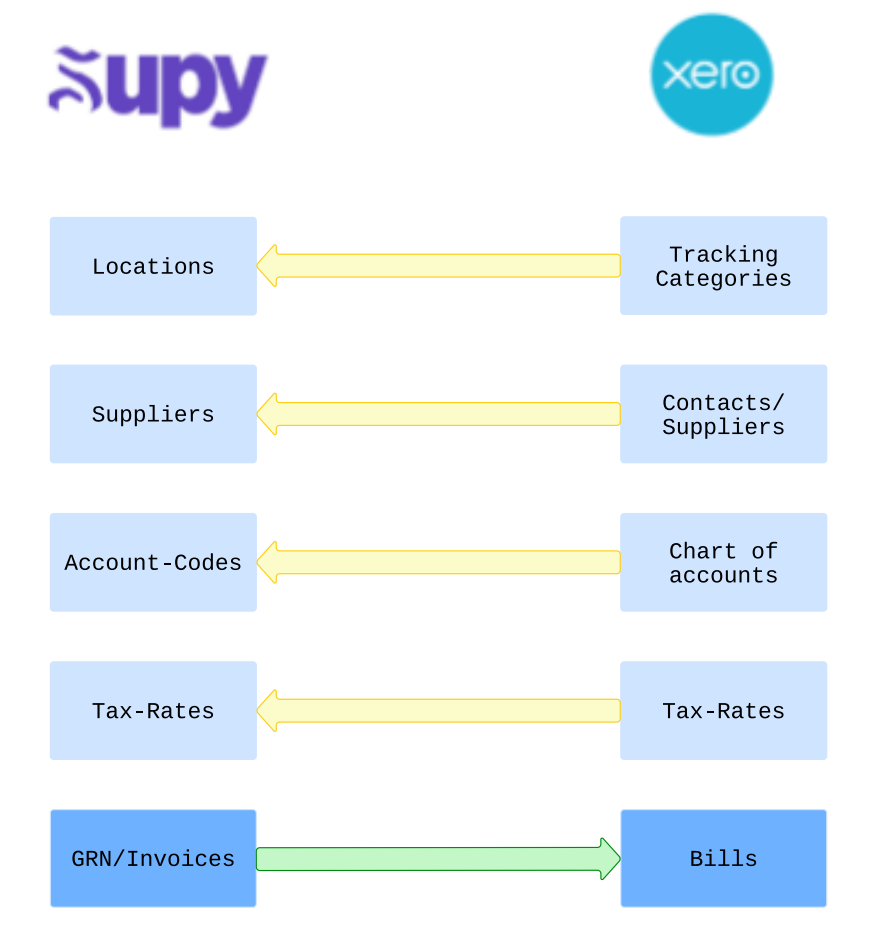
After entering valid credentials (i.e. having admin or adviser role) the page navigates to authorization UI, where an organization has to be selected and then on click of continue; Supy is then authorized to fetch tracking categories, contacts, account-codes, tax-rates and post bills to Xero.
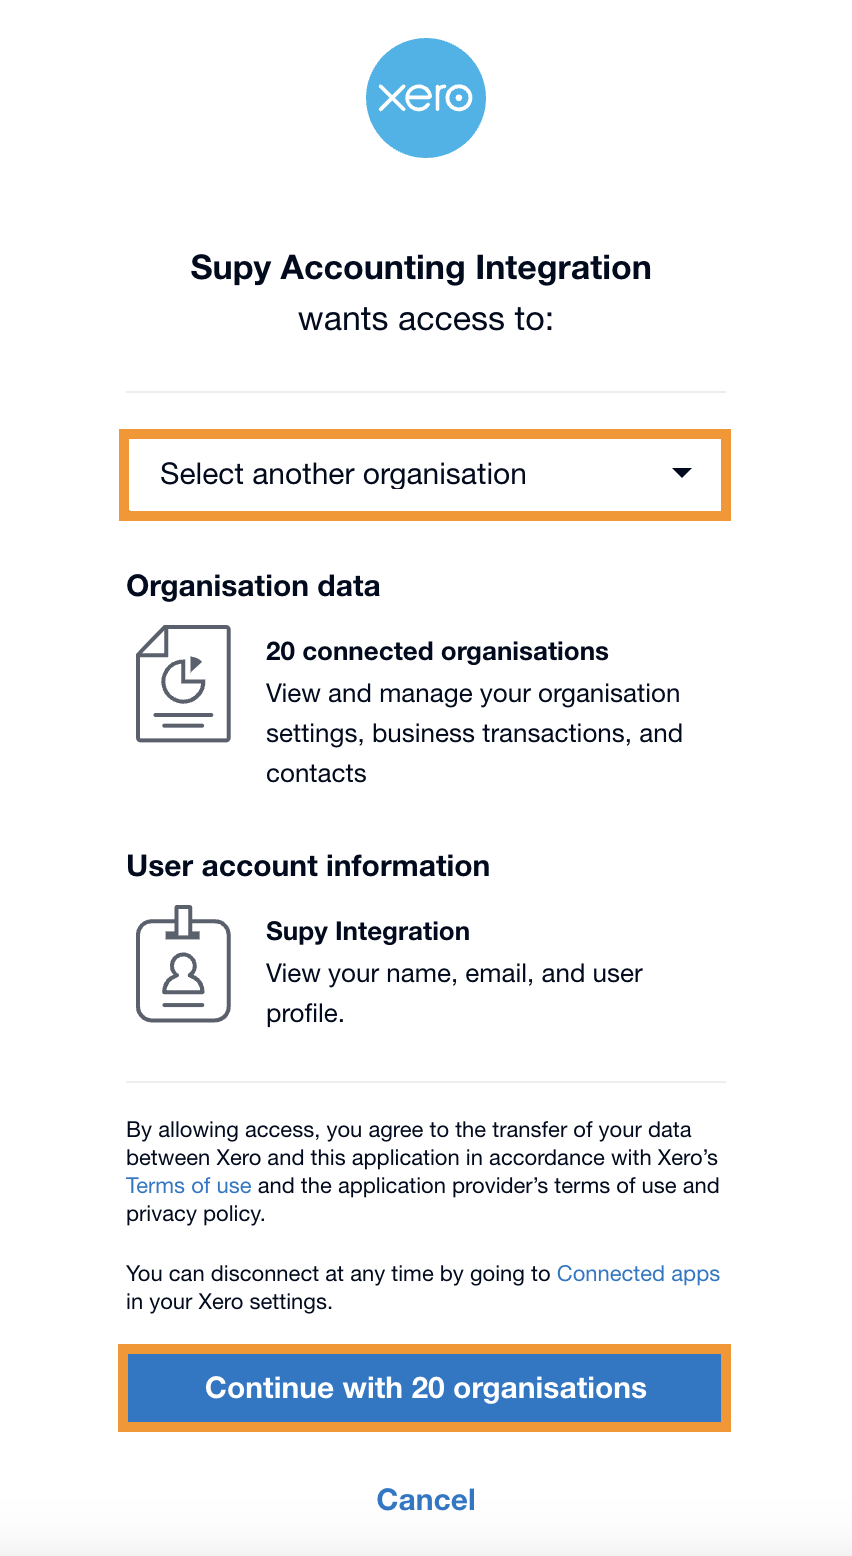
If the user doesn’t have sufficient access, more permission required will be
shown on the authorization UI.
After successful redirection to Supy, the integration is added.

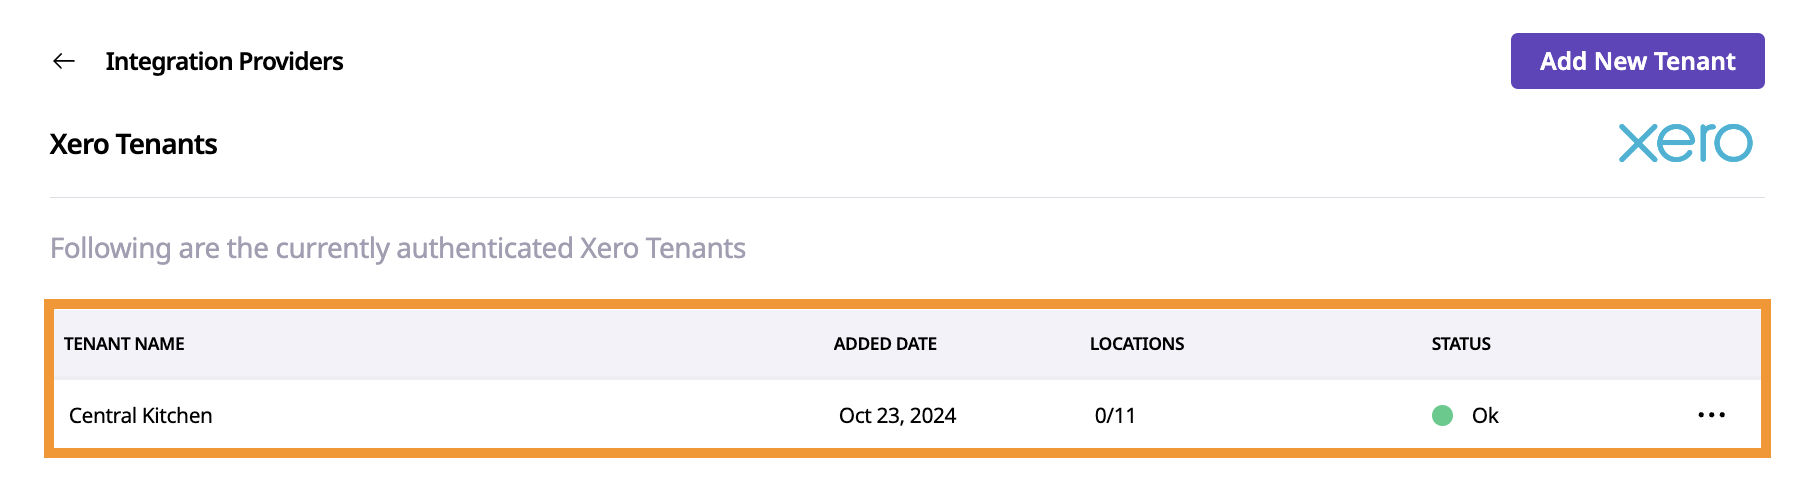
In Supy, a tenant refers to an organization within Xero. Most users will have a single tenant, but it’s possible to have multiple.
Example: If you manage multiple restaurant brands under the same Supy account, each brand might have its own Xero organization. When you activate these Xero organizations in Supy, each will appear as a separate tenant.
If additional tenants need to be added, click on “Add new Tenant” in the tenants listing page as shown below which will re-direct to the Xero login page again for authorization to the new tenant.
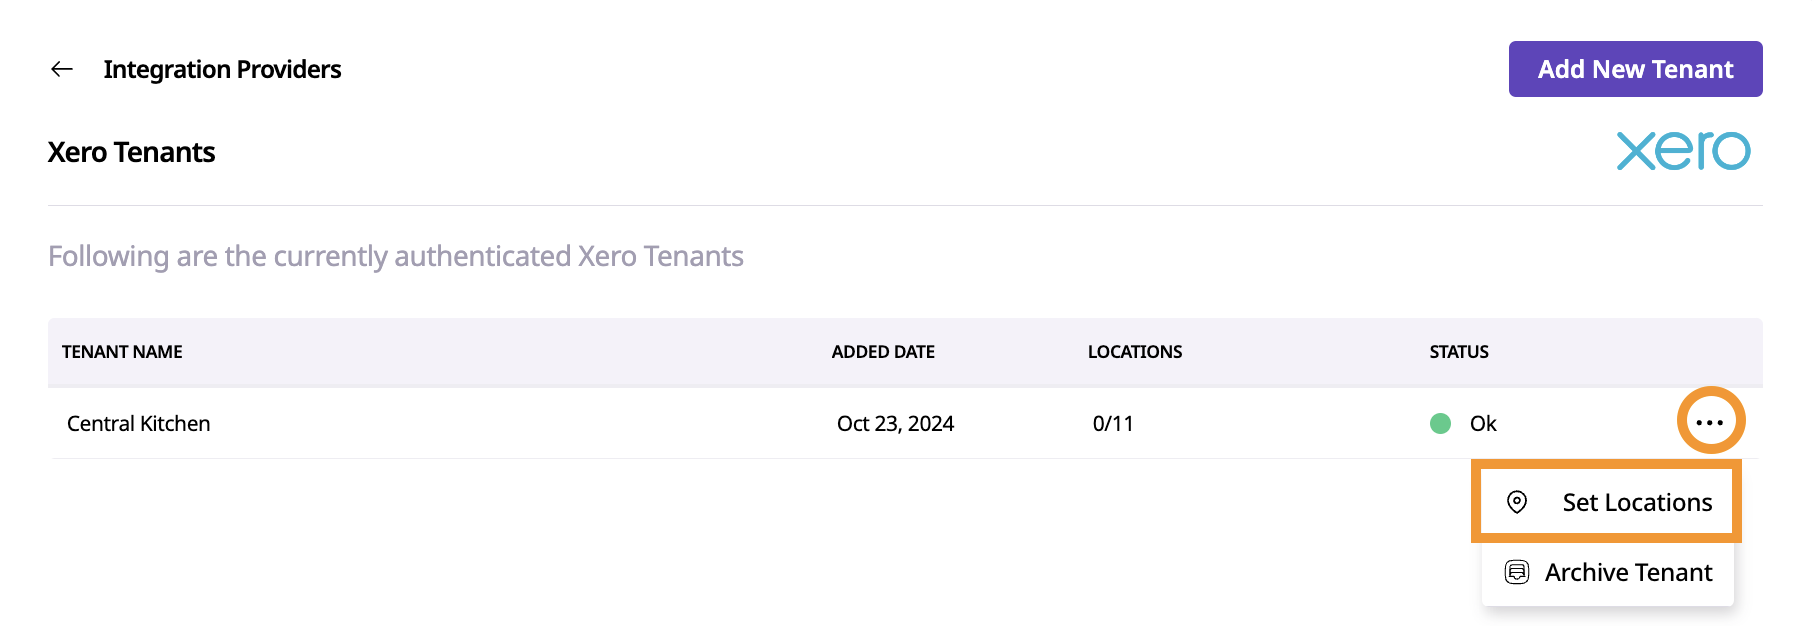
Once your tenants are set up in Supy, you can assign specific locations to each
tenant.
Go to Set Locations under the Actions menu.
You’ll see a list of all available locations across all branches.
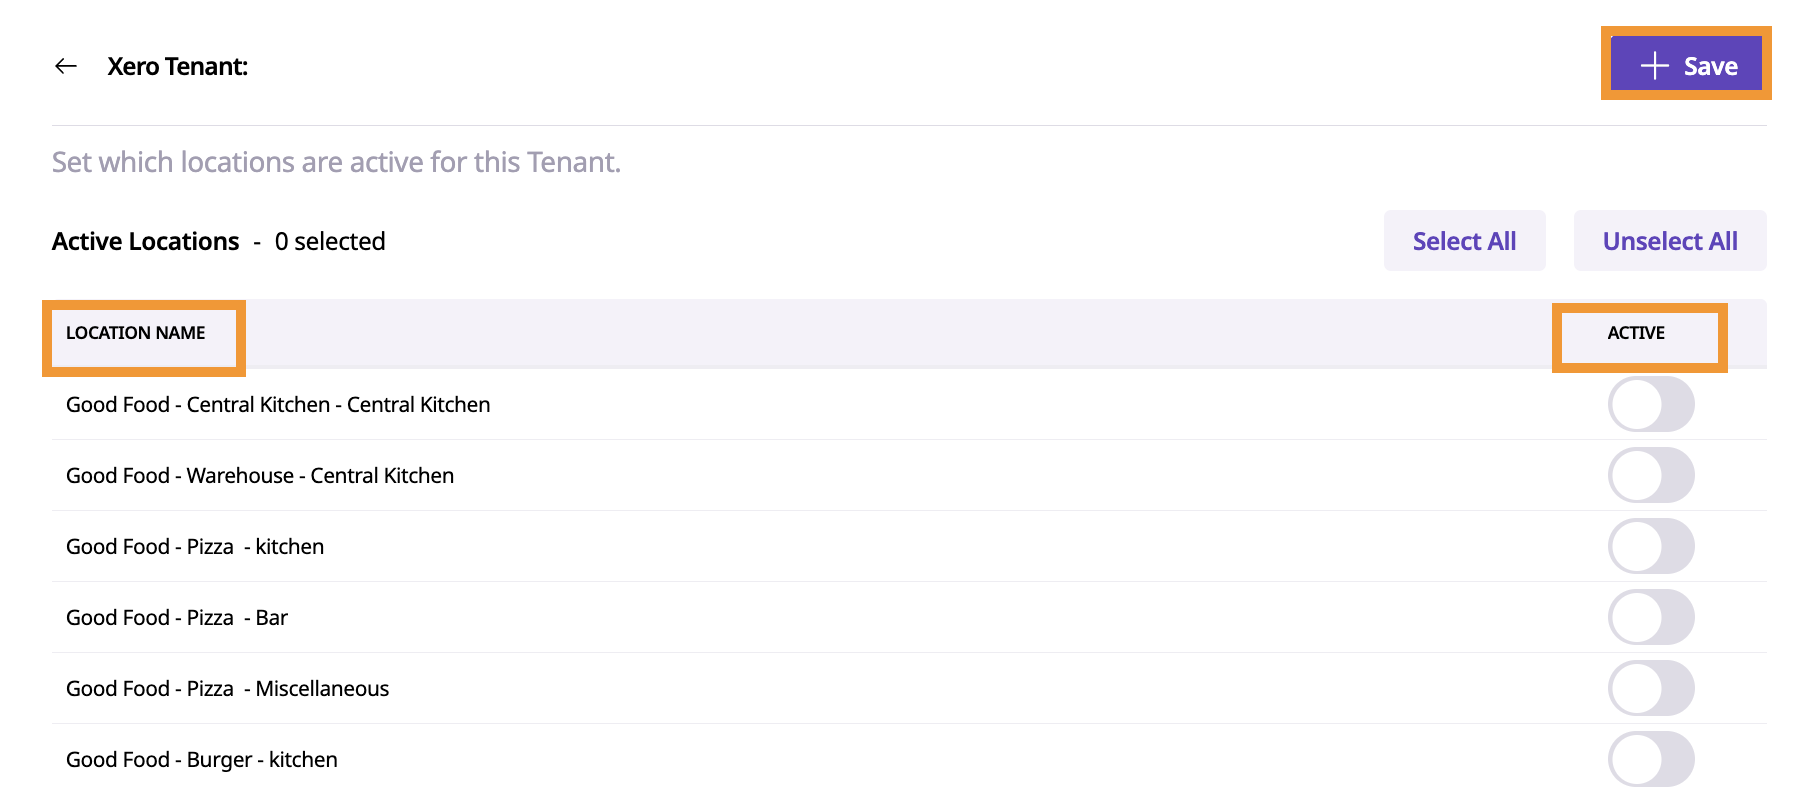
Choose the locations you want to assign to each tenant for integration and click on ‘Save’.
One Tenant Per Location
Each location on Supy can be associated with only one accounting integration tenant, or none at all.
If a location is already linked to a tenant, it cannot be assigned to another
tenant or any other accounting integration.
Supy will indicate this with a message like “Already active for another tenant” to prevent duplicate assignments.
Mappings are configured for each tenant to align Supy’s locations, suppliers, account codes, and tax rates with their respective counterparts in Xero. This ensures that bills are accurately transferred to Xero under the correct contact, complete with the required tracking categories, account codes, and tax rates.
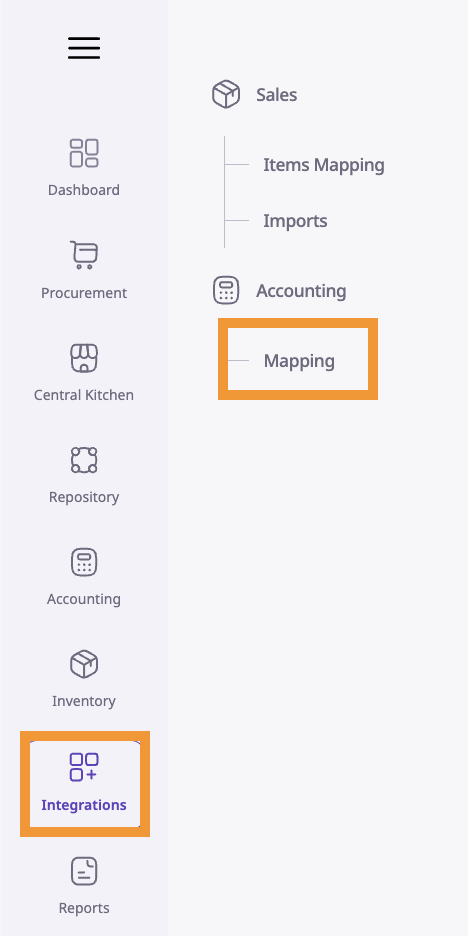
Navigate to ‘Integrations’ and then click on ‘Mapping’ under ‘Accounting’.
This isn’t a mandatory mapping.
Mapping locations in Supy to Xero’s tracking categories allows users to simplify
tracking of invoices and understand to which specific cost-center a particular item
belongs to.
Steps:
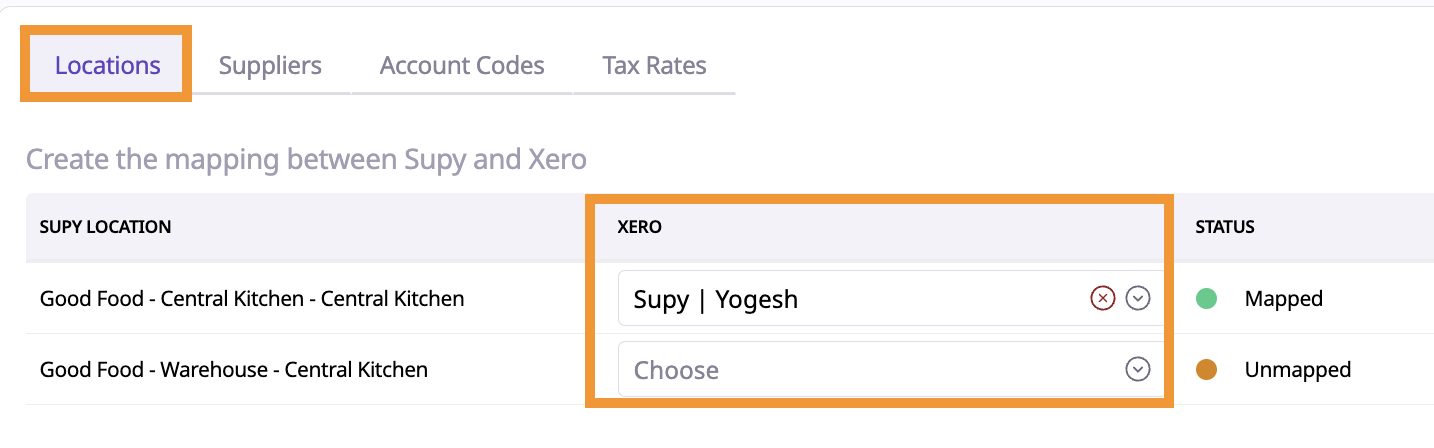
Mapping Locations:
Go to the Supy locations tab and click on the Xero column dropdown.
Select the appropriate tracking category of Xero to match each Supy
location.
Saving the Mapping:
After selecting a tracking category, click Save to update the mapping.
The status updates are as follows:
Mapped: Location successfully linked to a tracking category.
Unmapped: Location not yet linked.
Invalid Mapping: Tracking category deleted in Xero after mapping.
Creating Tracking Categories in Xero:
In Xero, navigate to Accounting → Advanced → Tracking Categories.
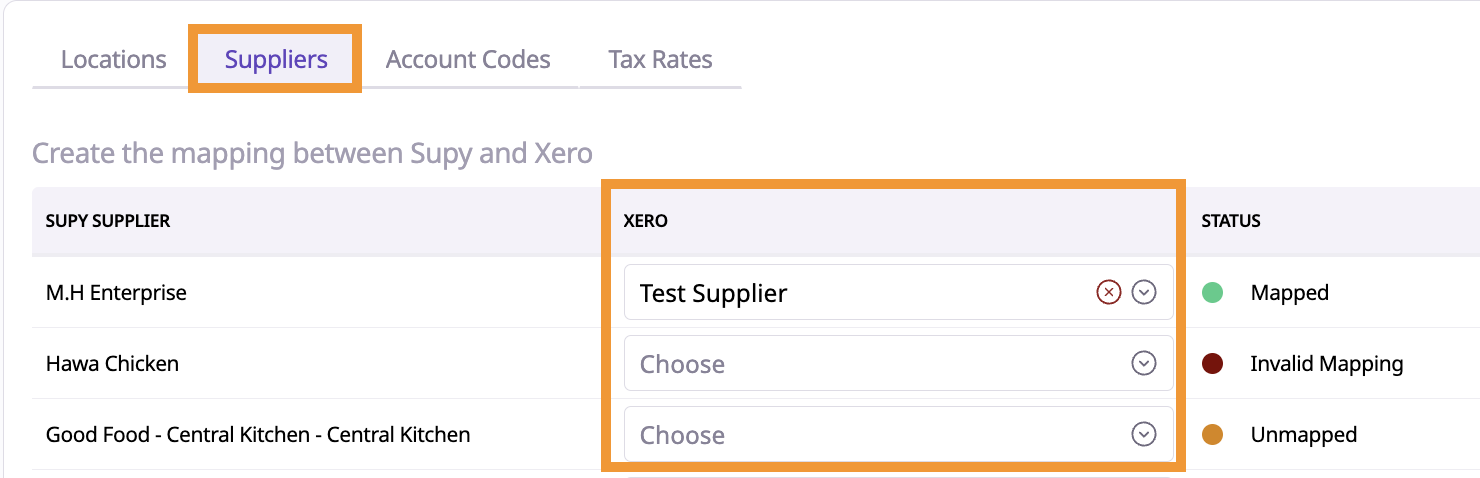
This mapping is mandatory.
It links each supplier in Supy with a corresponding contact in Xero, ensuring each
invoice is correctly attributed to the right supplier in Xero.

Steps:
Mapping Suppliers:
On the Supy supplier tab, select the appropriate Xero supplier(contact)
dropdown for each supplier in Supy.
Saving the Mapping:
After selecting a supplier, click Save to update the mapping.
The status updates are as follows:
Mapped: Supplier correctly linked to a Xero supplier.
Unmapped: Supplier not yet linked to a Xero supplier.
Invalid Mapping: Xero vendor archived or deleted after mapping.
Mandatory Mapping Validation:
As this mapping is required, an error will be shown if users attempt to post
an invoice to Xero without linking the Supy supplier to Xero vendor.
Creating Contacts in Xero:
In Xero, go to Contacts → Suppliers to create suppliers.
Account codes in Supy refer to the Chart of Accounts in Xero.
This is a mandatory mapping, as a default account is required to post invoices to Xero, in case an item is missing an accounting category on Supy.
Mapping account codes align Supy’s item purchases with Xero’s Chart of
Accounts. This ensures that every item in Supy reflects the correct account code
on Xero invoices.
Steps:
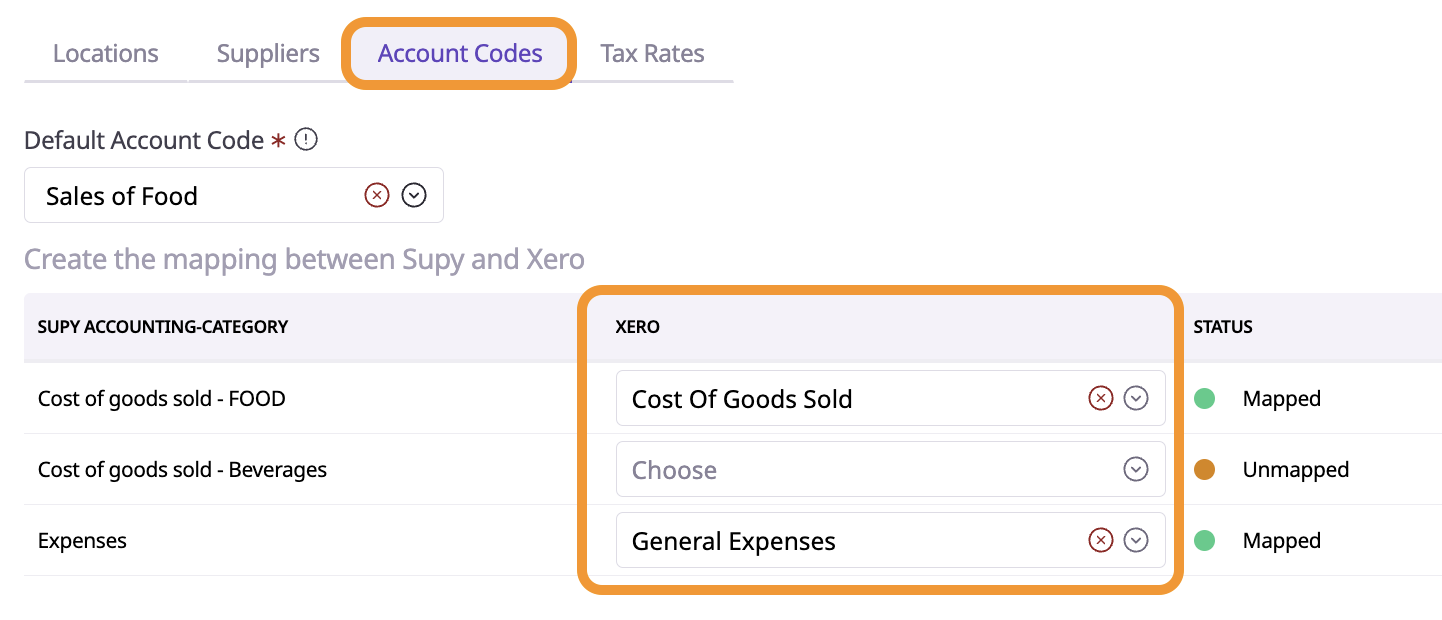
Mapping Account Codes:
Go to the Supy Account Code tab and click on the Xero column dropdown.
Choose the appropriate Xero account code for each Supy accounting
category and click Save.
The status updates are as follows:
Mapped: Accounting category linked to a Xero account code.
Unmapped: Accounting category not linked to any Xero account code.
Invalid Mapping: Xero account code deleted after mapping.
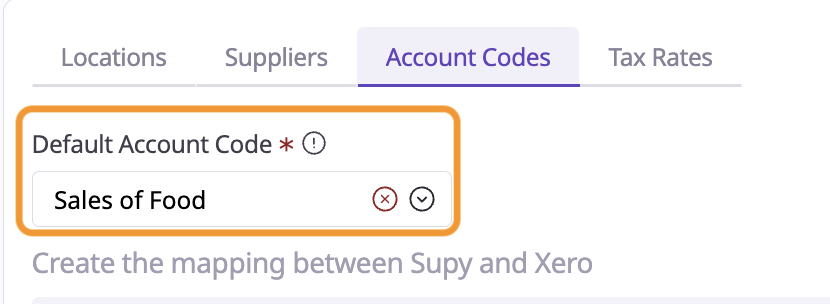
Setting a Default Account Code
If items lack a specific accounting category or a mapped Xero account
code, Supy will use the default account code (e.g., Cost of Goods Sold).
Account codes are mandatory to post invoices in Xero.
Creating Account Codes in Xero:
In Xero, go to Accounting → Chart of Accounts to set up or customize account codes.
This isn’t a mandatory mapping, but linking tax rates in Supy to Xero’s tax rates
makes tax calculation smoother and reduces manual adjustments on invoices.
Steps:
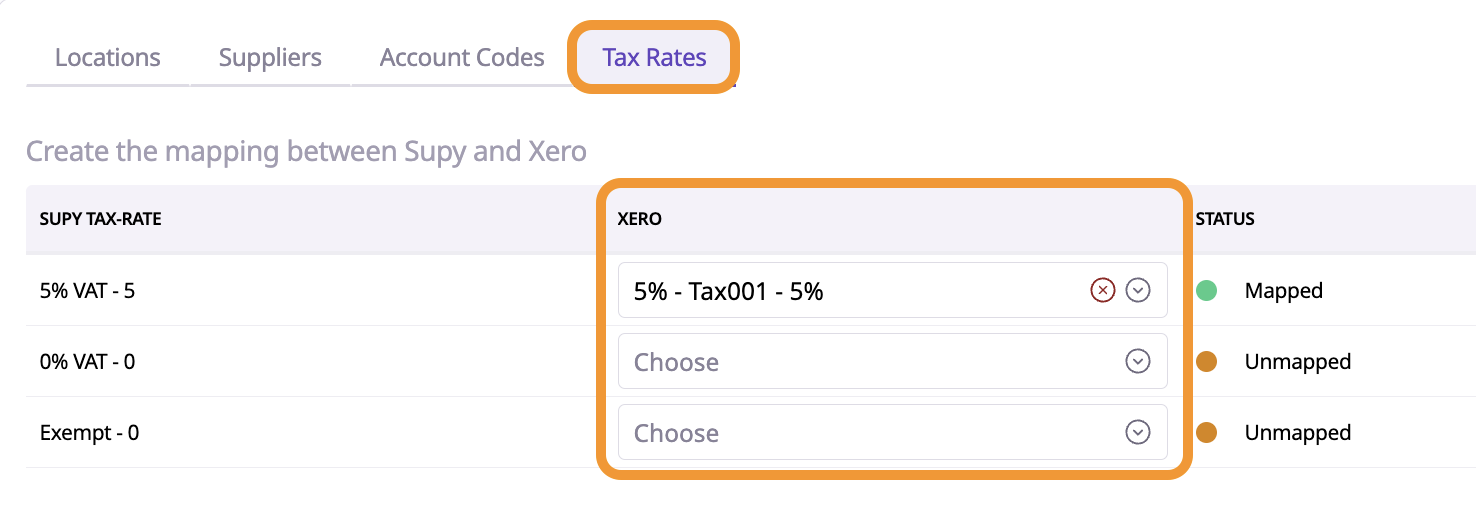
Mapping Tax Rates:
Go to the Tax Rates tab in Supy.
In the Xero column dropdown, select the appropriate Xero tax rate to
match each Supy tax rate.
Saving the Mapping:
After selecting a Xero tax rate, click Save to confirm the mapping.
The status updates are as follows:
Mapped: Tax rate successfully linked to a Xero tax rate.
Unmapped: Tax rate not yet linked.
Invalid Mapping: Tax rate deleted in Xero after being mapped in Supy.
Create Tax Rates in Xero:
Go to Accounting → Advanced → Tax Rates for creating tax-rates.
Steps:
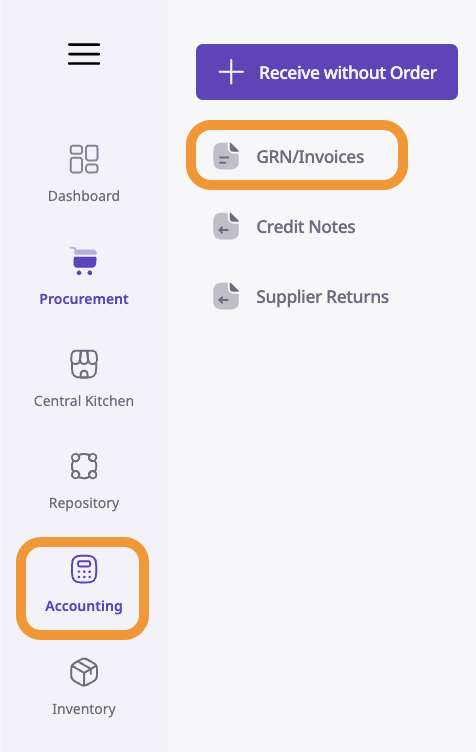
Accessing GRNs/Invoices:
Go to Accounting → GRN/Invoices in Supy to access.
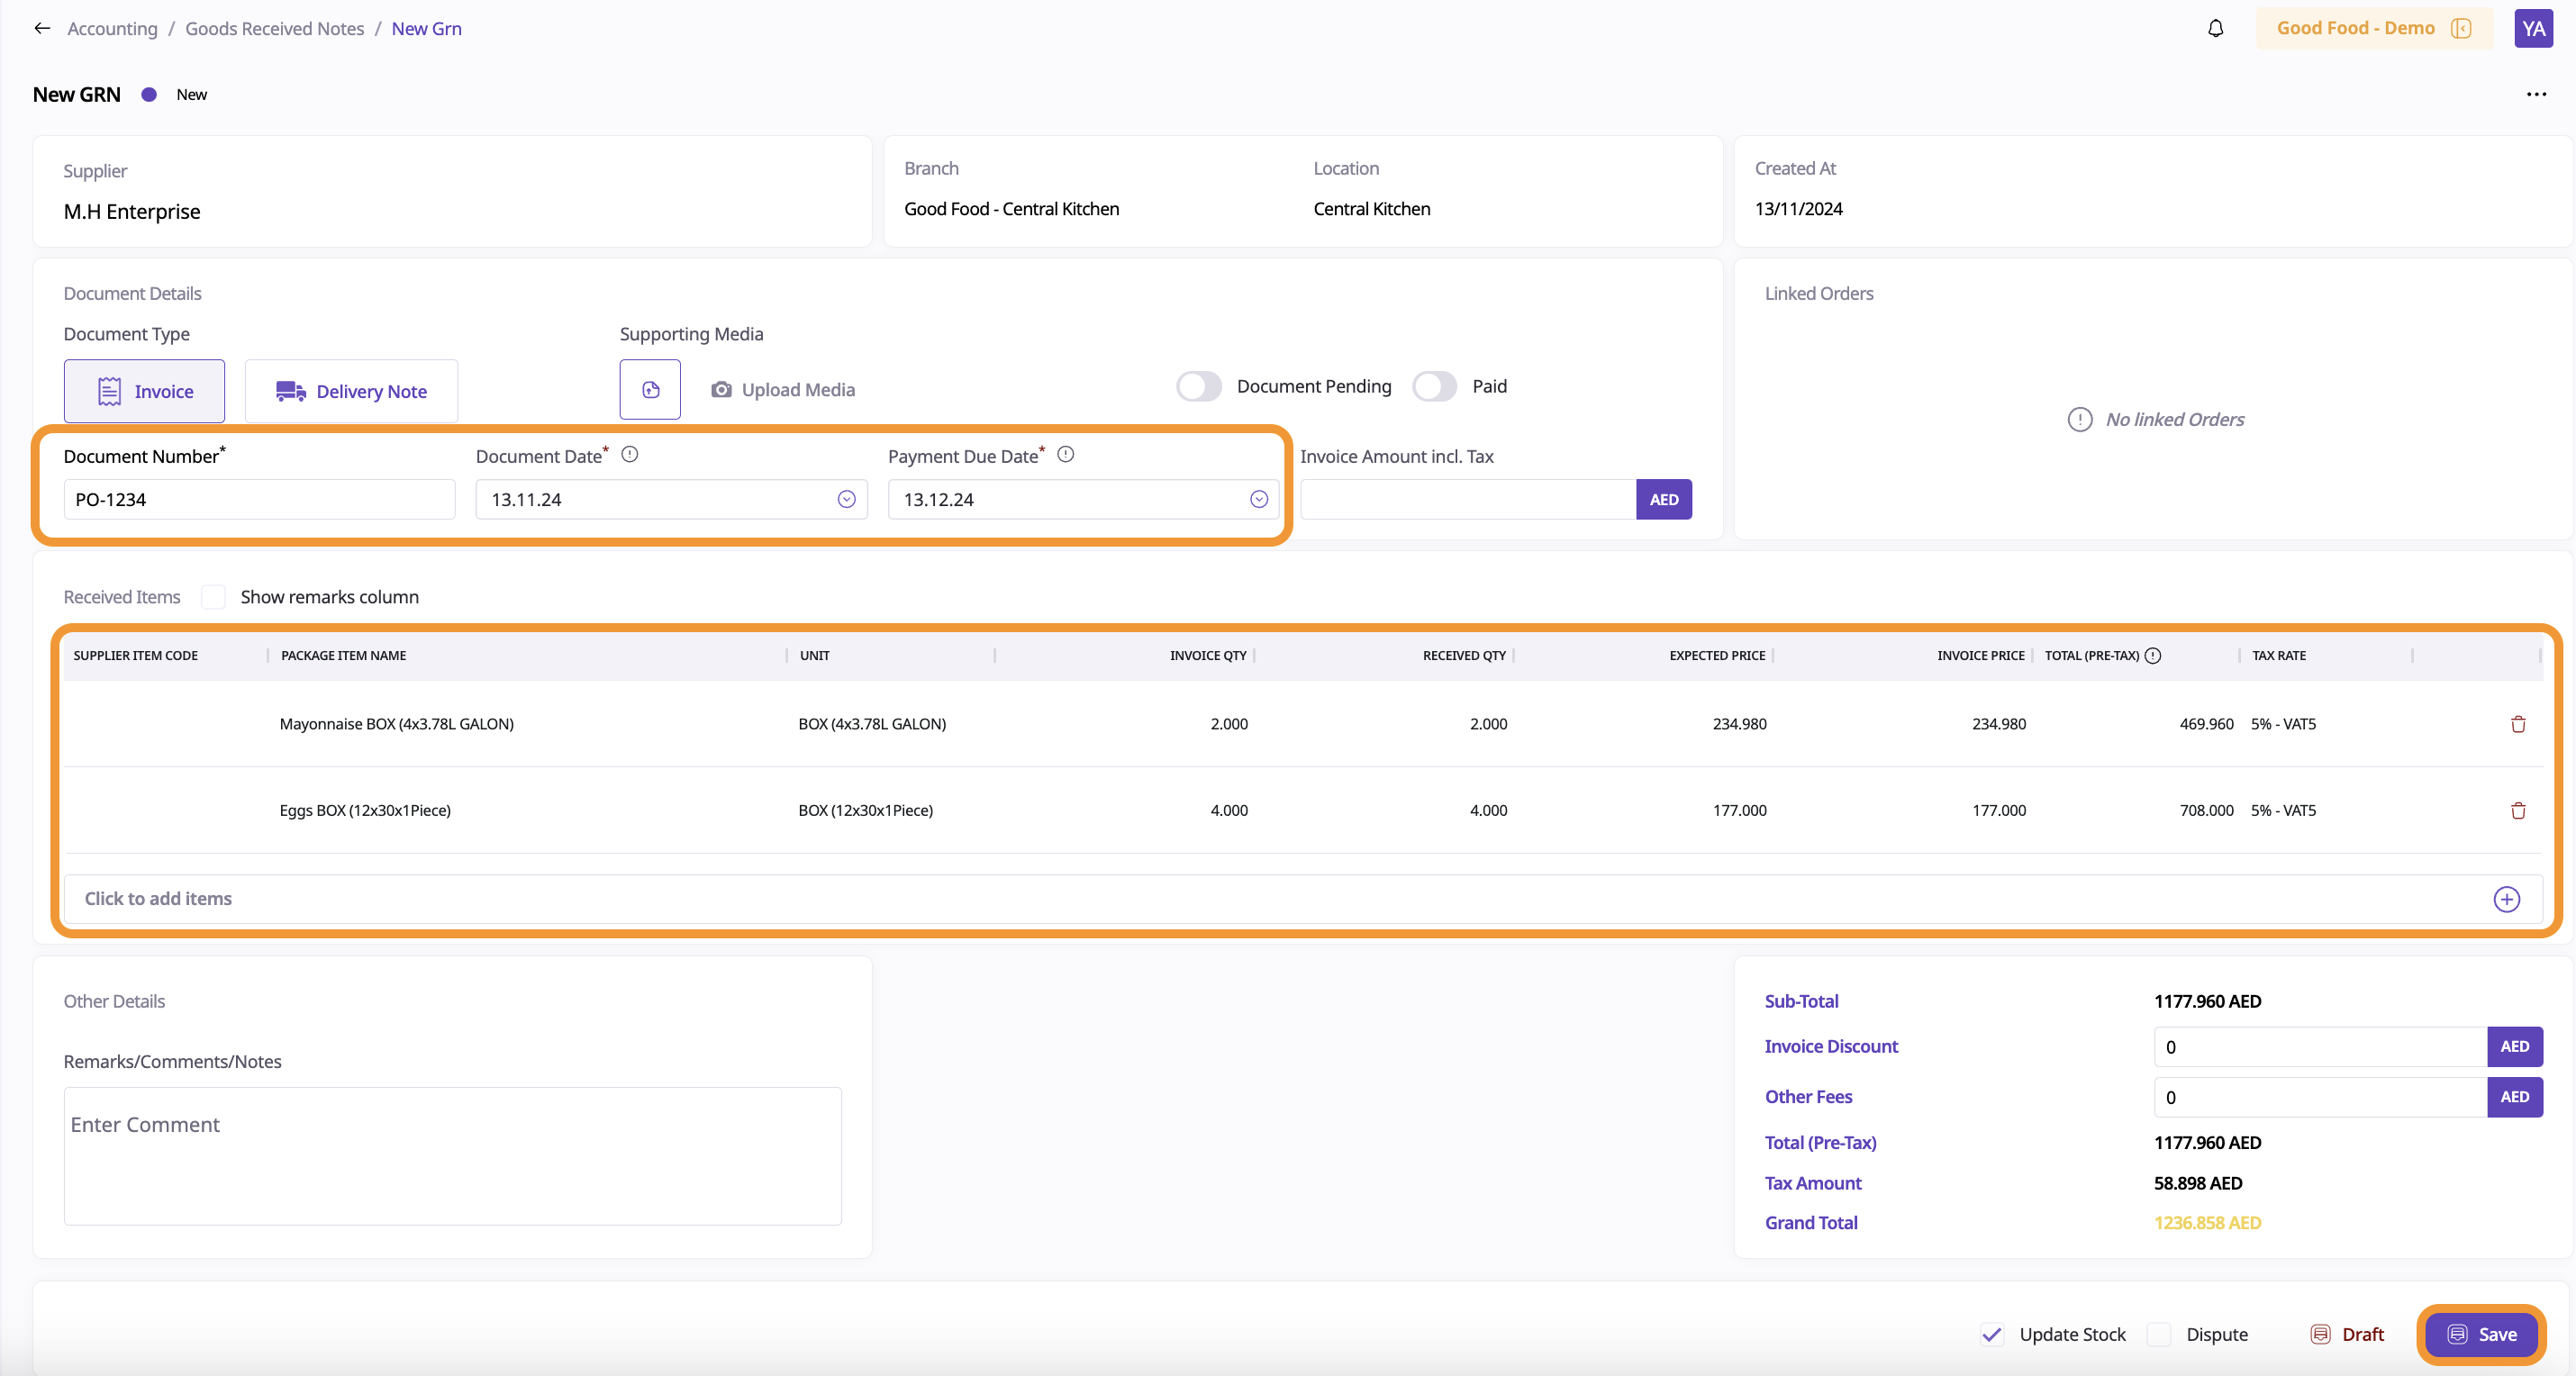
Review and Edit Invoice Details:
Enter fields like Document Number, Document Date, Invoice Amount, Invoice Discount, Add Items, and Due Date as needed.
Once the updates are complete, Save the invoice for an accounting team member to review before posting.
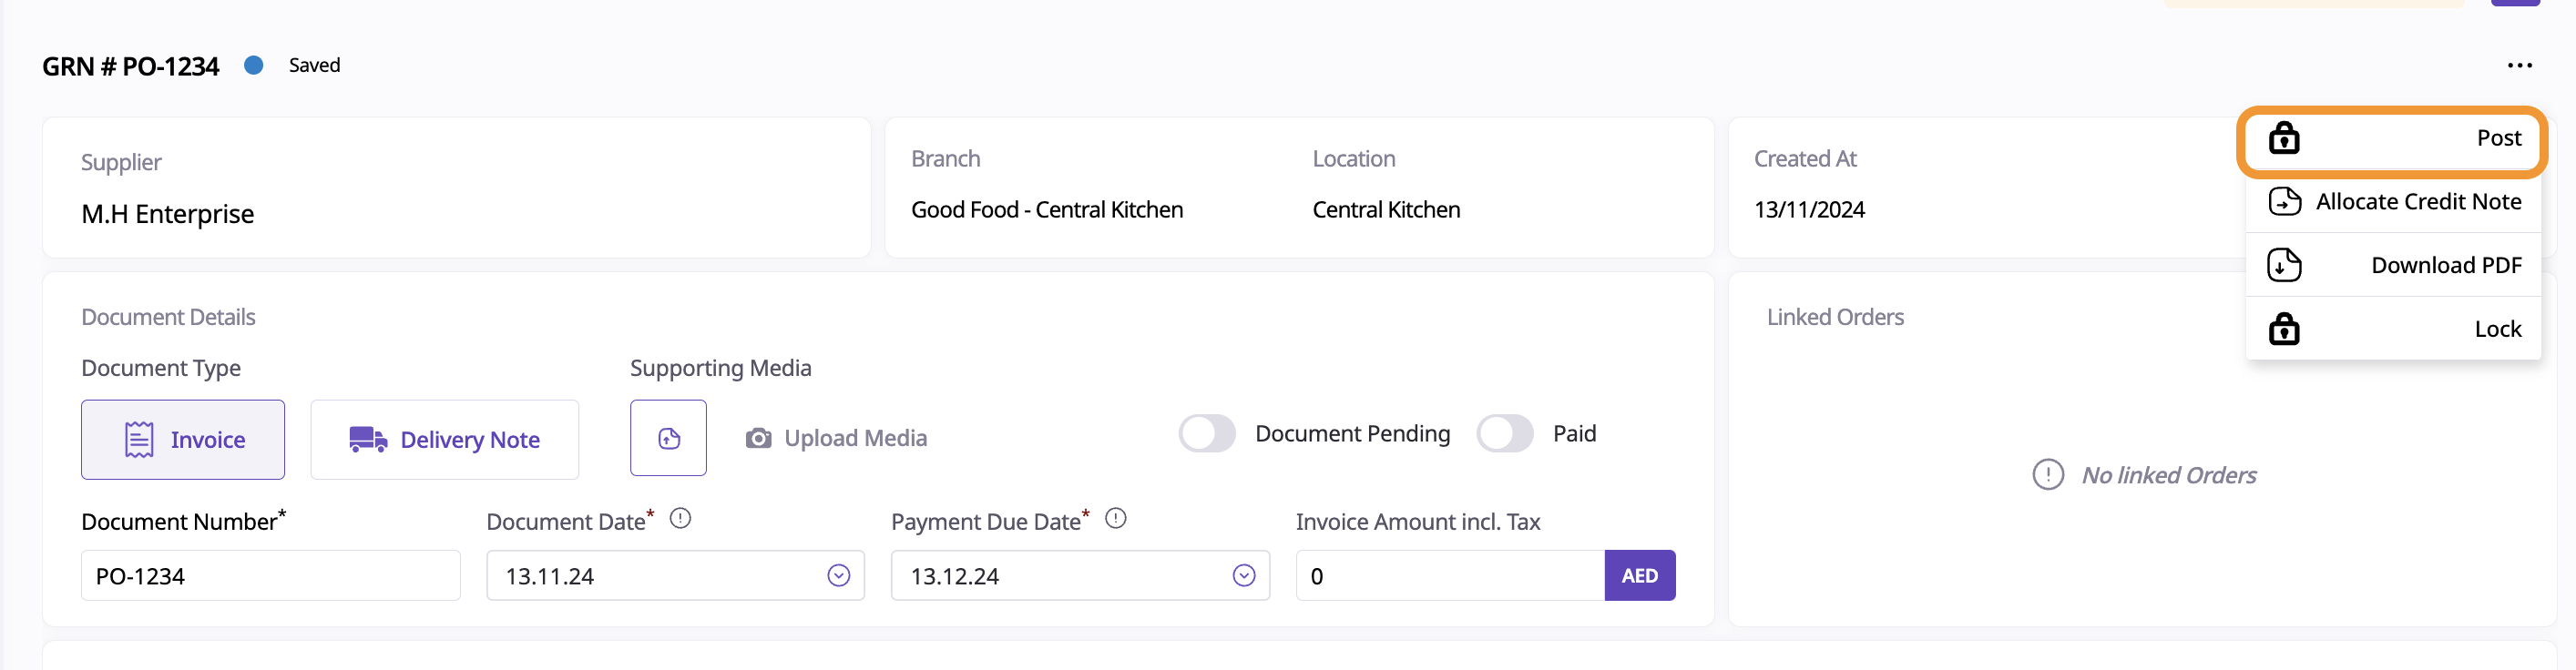
Posting the Invoice to Xero
After the review, click Post from the actions to push the invoice from Supy to Xero.
A confirmation alert will appear, notifying that this action will push the invoice to Xero.
Handling Error Messages:
Missing Account Code:
If a default account code or Xero account code is missing, an error will display: "Default account code is not set."
Resolve this by:
Assigning an Accounting Category for the items on the invoice.
Setting a default account code in the Account Codes Mapping.
Unmapped Supplier:
If the supplier in Supy is not linked to a Xero vendor, you’ll see "Supplier of invoice is not mapped." Resolve this by mapping the Supy supplier to the corresponding Xero vendor.
Reviewing the Posted GRN in Xero:
Once the GRN is successfully posted, the status in Supy updates
to Posted and syncs with Xero.
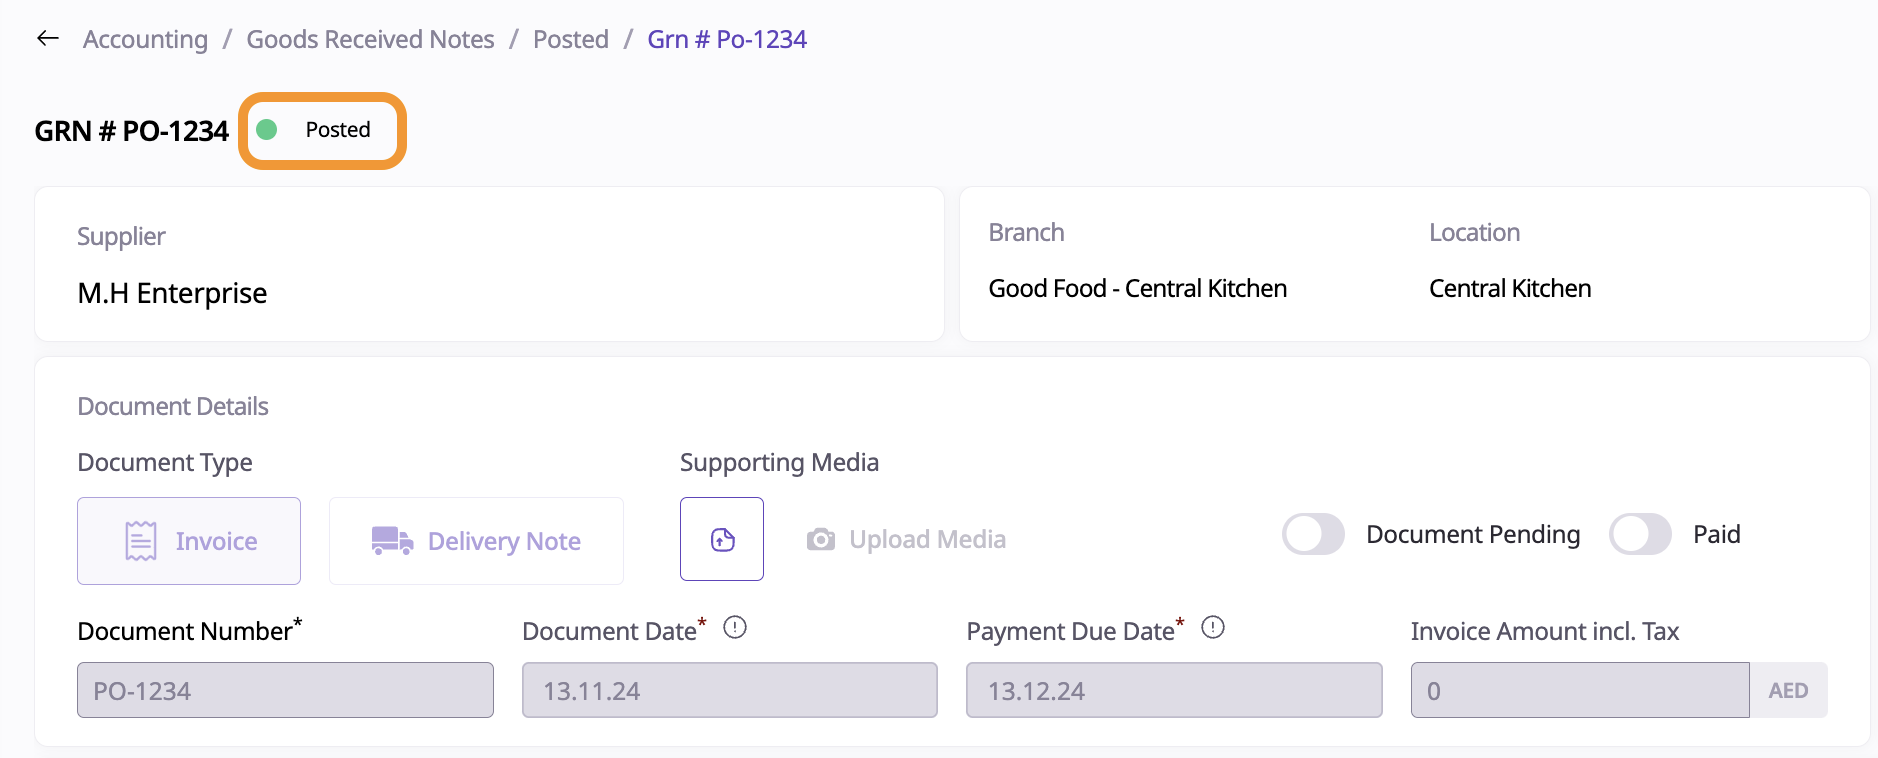
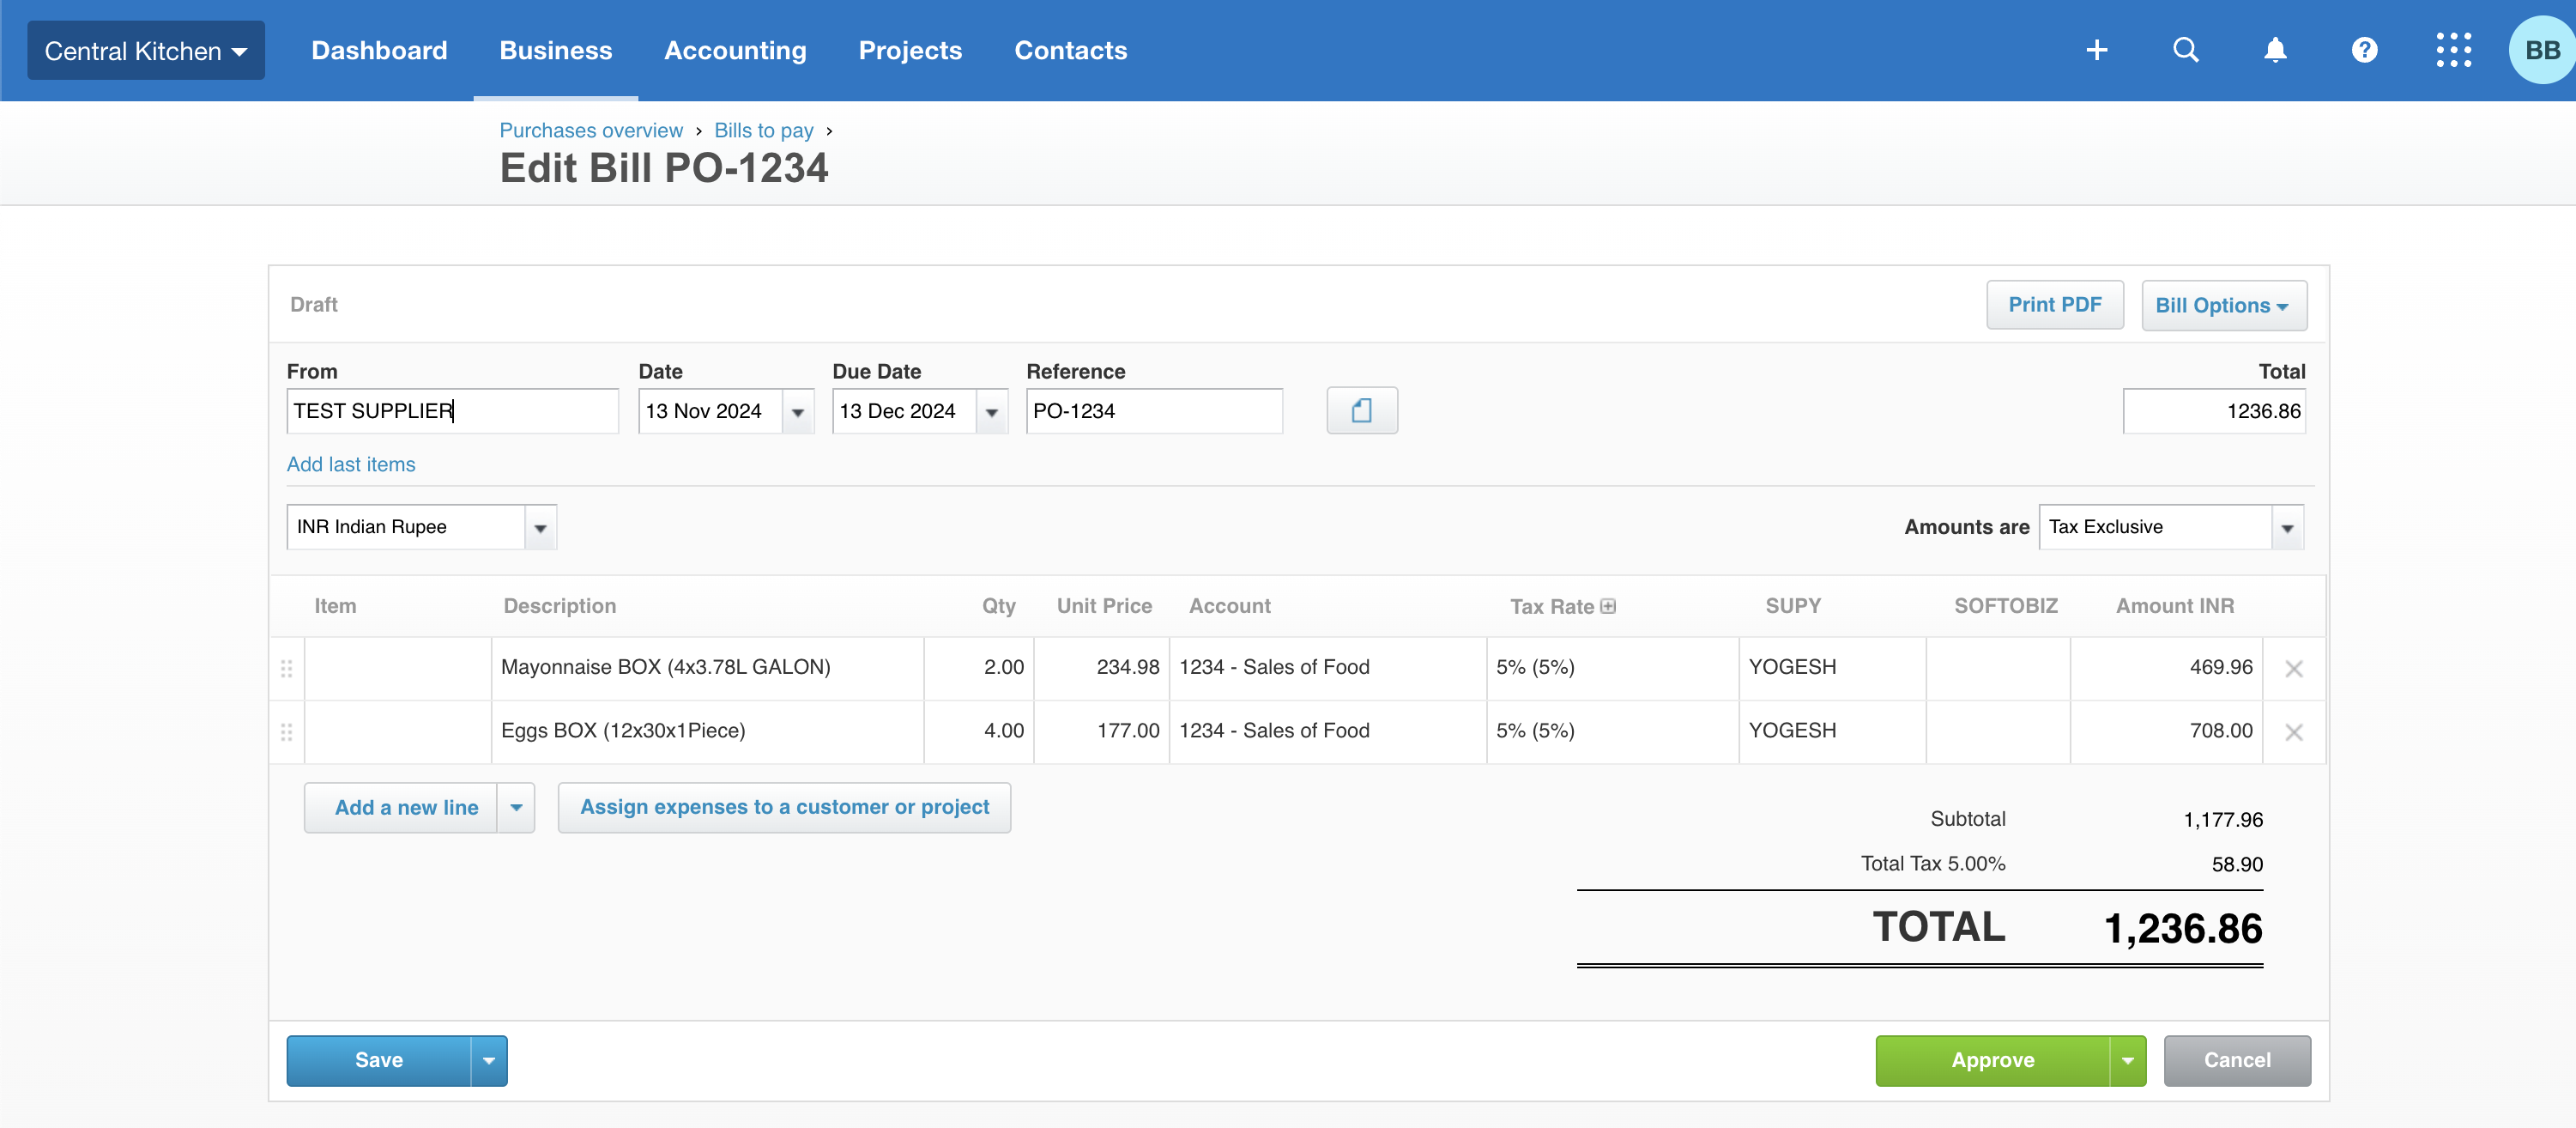
Posted GRNs appear in Xero under Business → Bills to Pay with a status of Draft, allowing further edits in Xero if needed.
Note: On Supy, the invoice is marked as Posted and cannot be edited after posting.
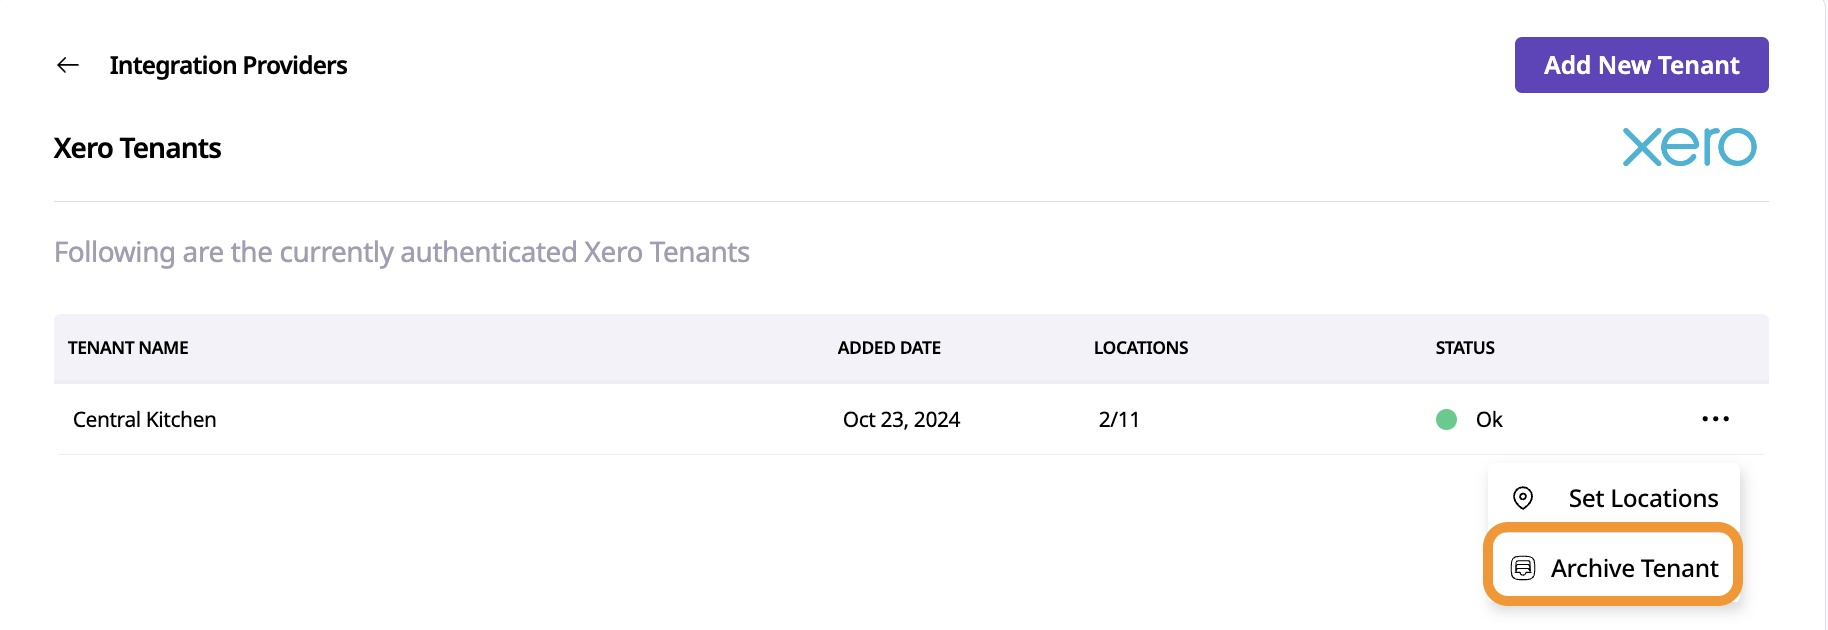
Navigate to Settings—>Integration—> Open the tenant and from the actions, click
on Archive Tenant.
Disconnecting On Xero:
Navigate to Organisation Settings—>Connected App, then click on Disconnect button for Supy Accounting Integration.